So today was very wet and a bit cold...I was going to go to the carboot sale but when it started tipping down at 8.00 I was glad I was sat with a nice cup of tea, bacon sandwich and the Sunday papers...So in the end we haven't really left the house today. It's been a day for resting and nourishing or in other words, slobbing about in comfy clothes and eating lots.
CAKE
This morning I made lots of lemon and raisin fairy cakes and a couple of loaf shaped cakes. I freeze the fairy cakes (not iced) and then take them out each day for lunchboxes. They defrost perfectly by lunchtime and taste fresh and moist. I let the boys decorate some to keep them busy for a while. I started off watching them and helping/interfering but in the end I just had to walk away. The mess, the lack of style, the icing everywhere...better just to let them go for it and clear up afterwards. Zac had icing in his ears! So my cakes today didn't look all that, but they smelt good and my boys said they tasted good, especially the ones they had decorated.
Here is the recipe I use for all my sponge cakes, it is adapted from Delia's 'All in One Sponge' from her book 'Complete Cookery Course'.
All in One Sponge Cake Recipe
The Sponge Ingredients
175g / 6oz Self-raising flour, sifted
1 Teaspoon baking powder
175g / 6oz Soft 'spreadable' butter, at room temperature - I use full fat 'Lurpack Spreadable'
175g / 6oz Caster sugar - if you can get 'golden caster sugar' which is unrefined, that has a nicer taste but don't worry if not
3 large eggs
2-3 drops of vanilla essence - if making a plain sponge or 1 tablespoon sieved cocoa if making a chocolate sponge
The Icing Ingredients
115g / 4oz soft butter
230g / 8oz icing sugar
1-2 tablespoons milk
For white - A few drops vanilla essence
For choc – 30-50g / 1-1.5oz melted dark chocolate - highest amount of cocoa solids you can get.
How to bake it...
Pre-heat the oven to gas-mark 3 (170 C). You will need 2 x 7-8 inch sponge tins. Each should be no less than 1 inch deep. You can get ones where the bottom comes out - these are quite good. Butter them well and then flour them.
Take a large, very roomy mixing bowl and sift the flour, baking powder and cocoa powder into it holding the sieve high to get lots of air into the flour (quite important). Then gently beat together the eggs in a separate bowl and then add these, with all the other ingredients into the big mixing bowl and whisk everything with an electric hand whisk until thoroughly combined.
If the mixture doesn't drop of the wooden spoon easily when tapped on the side of the bowl then add 1-2 teaspoons of tap-warm water and whisk again.
Now divide the mixture between the two prepared tins, level off and bake on the centre shelf of the oven for about 30 minutes. You should be able to see the edge of the cake coming away from the sides of the tin - this is a sign the cake is ready. When cooked and out of oven, leave them in the tins for only about a minute, then loosen the edges by shaking the tin from side to side and then rotating and repeating. It should come loose but if it doesn't take a palette knife and slide it around the edge. Turn them on to a wire cooling rack. Mary always places the tin, once it has cooled off a bit, back over the top of the cakes, apparently it stops them from drying out.
1 heaped teaspoon per normal cupcake for 24 cupcakes.
Icing - put all the ingredients in a bowl and mix together - use half the icing for the middle of the cake and half for the top. Make sure the cake is properly cooled before icing or it will slide off.
Icing - put all the ingredients in a bowl and mix together - use half the icing for the middle of the cake and half for the top. Make sure the cake is properly cooled before icing or it will slide off.
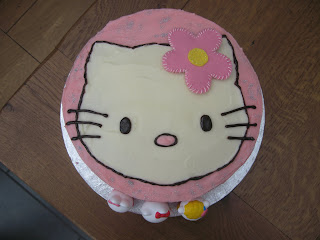
Here are some of my other cakes...all the same recipe...thanks Delia or 'Darling Delia' as my Mum in Law would say!
 |


No comments:
Post a Comment