This lettering for a card was done with 2 threads in back stitch. I didn't transfer the words on. I just wrote them directly onto the fabric with a normal pencil. In areas where I didn't quite sew directly over the pencil, I just rubbed out afterwards with a normal white rubber...
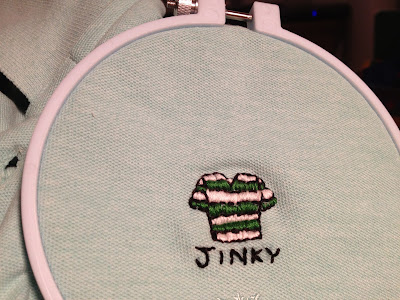
I also personalised a T-Shirt for my Mum's husband, Willy, for Christmas. He is a fan of the Celtic footballer called Jinky Johnson...and I think his golfing mates call him Jinky or something (bloke humour). So anyway, I bought an ordinary polo shirt from good old M&S and embroidered it for him...It's obviously a bit of a joke, but he loved it and wears it to golf. So here's how I did that:
First of all, I looked up Jinky and decided it would be much to hard to embroider the man himself, even with his distinctive red hair. I decided to go for just the Celtic shirt and his name. Would you believe I had to look at a youtube tute on how to draw a football shirt?? Well I did. Illustration and drawing have never been a skill of mine. I think I printed the name 'Jinky' out in a plain font like Tahoma.
Before I did anything else I used some t-shirt stabiliser on the back of the section I was going to be embroidering as apparently T-shirt or jersey type materials are notoriously hard to stitch on due to the stretchy nature of the fabric. I got all of this information from this book...You can use 'freezer paper' as a stabiliser too. I have a roll from the US courtesy of Auntie Jane as I don't think it's available in the UK.
Once I had the football shirt shape and the font for 'Jinky' at the right size I put them together on one piece of paper. I then turned that paper over and traced over the design on the back so that the lettering was back to front. I used the transfer pen pictured below.
Then I ironed it on to the front of the polo shirt...Slightly scary as if it went wrong the T-shirt was ruined and this was all done a few days before Christmas!
It didn't really matter that the 'I' was missing. I was just glad it hadn't moved during the transfer process and left lots of black marks everywhere. Next step was to pop it into an embroidery hoop, stabilising paper and all. I used 6 threads in satin stitch for the stripes and 3 threads back stitch for the words and outlining. In hindsight I think I would have cut both down and used 3 threads for the satin stitch and 2 threads for the outlining and words. Anyway, it looked alright when it was finished and got some laughs when it was opened on boxing day.
Probably not my best work but as a novelty present it was a success and once the T-shirt was pressed it actually looked much better.
More pre-Christmas catch up posts to follow!
Nix!


2 posts in one week, you are on a roll! Love Meredith's present. I've had a nightmare with mine (kimono top), had to abort project! Now not sure what to do.....
ReplyDelete